Last Updated on December 6, 2021

There are only 2 apps on the market that successfully offer HREFLANG tag implementation for Shopify.
And if you have more complicated requirements, they can be tricky to work with.
This guide will help you navigate HREFLANG on Shopify, and make sure Google chooses the right version to show to your International visitors.
What is HREFLANG and How Does It Work?
- A HREFLANG tag, is code used to tell Google about different language or location versions of the same web page.
- HREFLANG tags help to define unique based on either the language they speak (en), or the country their located + language (en-us).
- Google treats each URL in HREFLANG tags as part of the same URL for ranking purposes, they’re simply the language or the local appropriate version of the page to display to visitors.
- The implementation I’m most familiar with, is adding HREFLANG tags into the head of a website, so that is what I will discuss here (for HTTP Headers and Sitemap implementation, see Google’s advice here).
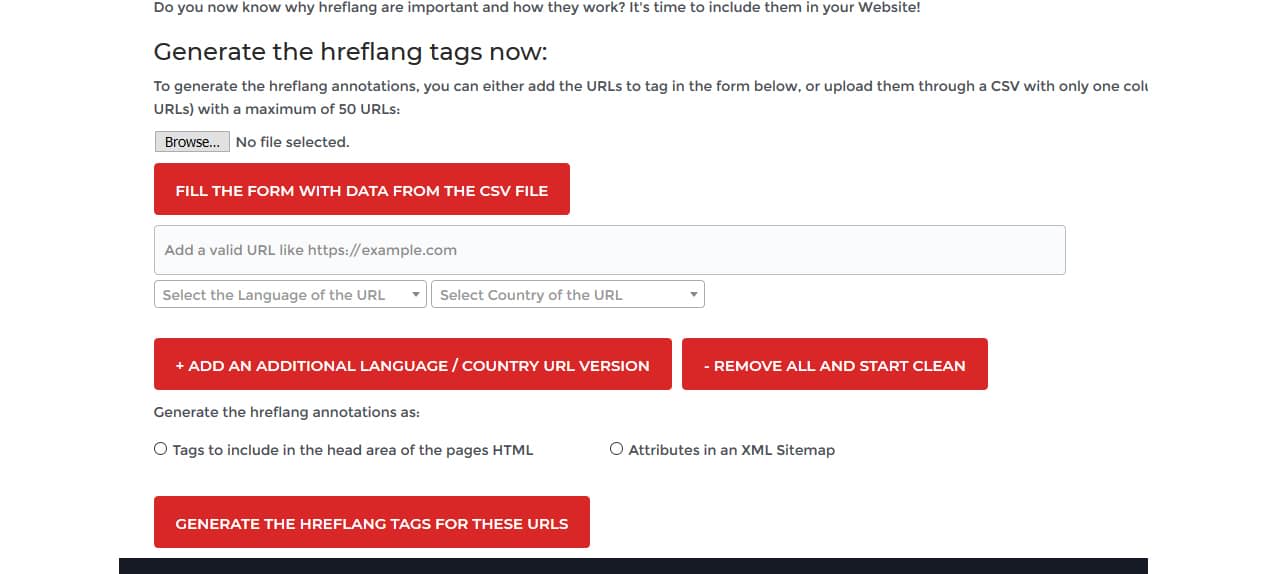
An example of HREFLANG tags (generated using Aleyda’s tool here):
<link rel="alternate" href="https://matt-jackson.com/" hreflang="en" />
<link rel="alternate" href="https://matt-jackson.com/es/" hreflang="es-es" />
<link rel="alternate" href="https://matt-jackson.com/fr-ca/" hreflang="fr-ca" />
<link rel="alternate" href="https://matt-jackson.com/fr-fr/" hreflang="fr-fr" />
<link rel="alternate" href="https://matt-jackson.com/" hreflang="x-default" />
The bold parts of the code are the bits to focus on.
- The HREF value, points to the URL on my website (hypothetically in the example) of where each specific language/local page is located.
- The HREFLANG value describes either the language, or language + location, that this URL is targeting.
How to choose your country / language targeting?
In a perfect world, you would have local pages for every single language + location variation possible.
However you need to match up the reward of having hyper localised content, against the investment of multiple page translations.
For example, French is spoken in many countries, including France and Canada. Should you have a unique page for France and a unique for Canada (french), or should you simply have a french language page?
On an ecommerce website, the Currency, delivery estimates, even perhaps Stock availability and product ranges may be different in France to Canada, in which case having a unique version for each would make a lot of sense.
However if you’re selling digital products, or selling the same range out of a central distribution location, then you may get away with having a currency switcher, and multiple delivery estimates depending on location.
Shopify Apps for HREFLANG and Translation
I have only found 2 apps on the Shopify store that both translate (using autotranslate) and implement HREFLANG tags.
Neither of them are perfect (you will probably need manual translations to fine tune it), and in lots of scenarios you will need to customise your implementation to supplement the SEO that the apps produce.
Here are the pros and cons of each:
WEGLOT
 https://apps.shopify.com/weglot
Pros:
- Helpful developers
- Developed on multiple CMS
- Can exclude URLS from translation.
- HREFLANG tags correctly created.
Cons:
- No International Sitemap
- Translated urls are messy: domain.com/a/l/fr/url
- Different country versions of the same language must be on a new domain/subdomain.
- No x-default tag.
- Multi-domain function doesn’t generate HREFLANG tags across domains.
LangShop
https://apps.shopify.com/langshop
Pros:
- New version allows for clean sub-folder implementation: domain.com/fr/
- Helpful developers
- International Sitemap
- Currency Selector Options
Cons
- Cannot integrate multiple stores for different languages (all translations and tags point to single domain).
- Different country versions of the same language must be on a new domain/subdomain.
- Cannot exclude certain urls.
How to manually create HREFLANG tags for Shopify Multi-sites
If you have a few different stores already targeting different languages, that use the same URL structure, and you simply want to add HREFLANG tags to connect them all, then here is what you need to do:
I will use an example to illustrate:
- We have domain1.com on 1 shopify account, targeting English
- We have domain2.fr on 1 shopify account, targeting French.
- We want our default url displayed to be the English account.
- Every URL string is the same on each website (eg Shoes collection on both is /collections/shoes)
We need to add HREFLANG code into the theme.liquid file for both the domain1.com site and the domain2.fr site.
Here is the code to add in the <head> section of theme.liquid file for both websites:
<link rel="alternate" hreflang="x-default" href="{{ canonical_url | replace: shop.domain, 'domain1.com' }}" /><link rel="alternate" href="{{ canonical_url | replace: shop.domain, 'domain1.com' }}" hreflang="en" />
<link rel="alternate" href="{{ canonical_url | replace: shop.domain, 'domain2.fr' }}" hreflang="fr" />
Here is a video guide to the implementation:
Pros and Cons of Manual Multi-Site Implementation
Pros:
- Quick and simple to setup
- No ongoing costs of apps.
- Allows for separate websites for different locals.
- Allows for multiple websites targeting the same language but different country (en-us, en-gb, etc).
Cons:
- Requires manual translation of all content and theme elements.
- Requires a new website for every language version.
Shopify Hybrid Approach – Using Apps and Multi-Store For Fast Translation & Micro Targeting
If you have a scenario where you want to target 3 languages on site1, and 3 languages on site2, then what do you do?
What if you want to target English speaking people in the UK on site1, and English speaking people in the USA on site2 as well?
Then a hybrid approach may help you.
The steps are as follows:
- Install your preferred translation app onto both of your stores.
- Enable each language variation you want on each (don’t worry too much about country specific for now).
- Customise the code to reflect your country specific choice on each (see next section for this code).
- Create manual HREFLANG tags from store1 to paste into theme.liquid <head> of store2 (and vice versa) so all stores have all versions of the HREFLANG tags (can be added into the WEGLOT hreflang snippet file instead).
- WEGLOT – exclude the HREFLANG override in the settings.
How to customise WEGLOT for country specific HREFLANG tags
NOTE: all customisations are reset when you change the language settings in WEGLOT, so save a copy of your edits and when you need to change the settings, make sure to paste them in afterwards.
Now this is different depending on if you’re editing the default language or a secondary language.
For the default language:
- Go to Shopify Admin > Online Store > Actions > Edit Code > Snippets > weglot_hreftags.liquid
- Find: <link rel="alternate" hreflang="{{ original_language }}" href="{{ canonical_url }}">
- And replace with: {% for language in original_language %} <link rel="alternate" hreflang="{{ language | replace:"en","en-gb" }}" href="{{ canonical_url }}"> {% endfor %}
- Save
Where that code says “en” and “en-gb”, these should be replaced with your default language, and your new location specific language respectively.
For secondary languages:
- Go to Shopify Admin > Online Store > Actions > Edit Code > Snippets > weglot_hreftags.liquid
- Find: {% for language in destination_languages %} <link rel="alternate" hreflang="{{ language | replace:"zh","zh-CN" | replace:"tw","zh-TW" }}" href="https://{{ request.host }}/a/l/{{ language }}{{ canonical_path }}"> {% endfor %}
- And add your additional language replacement rules to it in this section: hreflang="{{ language | replace:"zh","zh-CN" | replace:"tw","zh-TW" }}"
- Example replacement to change fr to fr-fr:
- hreflang="{{ language | replace:"zh","zh-CN" | replace:"tw","zh-TW" | replace:"fr","fr-fr" }}"
- You can add as many as you like using the same method.
- Save
Where that code says “fr” and “fr-fr”, these should be replaced with your default language, and your new location specific language respectively.
How to add HREFLANG tags from Site1 into Site2
So here is how to add the missing tags to each site. So the HREFLANG tags from Site 2 need to be added to Site 1, and vice versa (and if you have 3 sites, then Site 1 needs to have the HREFLANG tags from Site 2 and Site 3 added manually, etc).
The example from the video has one domain (ukdomain.com) targeting the UK, and one domain (domain.com) targeting English (default, US, and CA), French (CA), and Spanish (US).
The code that should be added to ukdomain.com to add the domain.com HREFLANG tags to it are:
<link rel="alternate" href="{{ canonical_url | replace: shop.domain, 'domain.com' }}" hreflang="en" /> <link rel="alternate" href="{{ canonical_url | replace: shop.domain, 'domain.com' }}" hreflang="en-ca" /> <link rel="alternate" href="{{ canonical_url | replace: shop.domain, 'domain.com' }}" hreflang="en-us" /> <link rel="alternate" href="{{ canonical_url | replace: shop.domain, 'domain.com/a/l/fr' }}" hreflang="fr-ca" /> <link rel="alternate" href="{{ canonical_url | replace: shop.domain, 'domain.com/a/l/es' }}" hreflang="es-us" /> <link rel="alternate" hreflang="x-default" href="{{ canonical_url | replace: shop.domain, 'domain.com' }}" />The code to add to the domain.com site, to add the HREFLANG tags from the ukdomain.com site is:
<link rel="alternate" href="{{ canonical_url | replace: shop.domain, 'ukdomain.com' }}" hreflang="en-gb" />And if the x-default hasn’t been added yet, then that should also be added:
<link rel="alternate" hreflang="x-default" href="{{ canonical_url | replace: shop.domain, 'domain.com' }}" />This will result in all HREFLANG tags being equal accross both versinos of your store.
Final WEGLOT Step – Stop Auto-Override
By default, on the translated versions of the page, WEGLOT will default to the original setup.
So we need to stop it from doing that, to ensure our custom tags appear on all pages consistently, including the translated versions of pages.
To do this, go to the “Edit Translations” section in the WEGLOT app, click on Project Settings, and in the EXCLUDED BLOCKS section, add “wg-hreflang” without quotes:
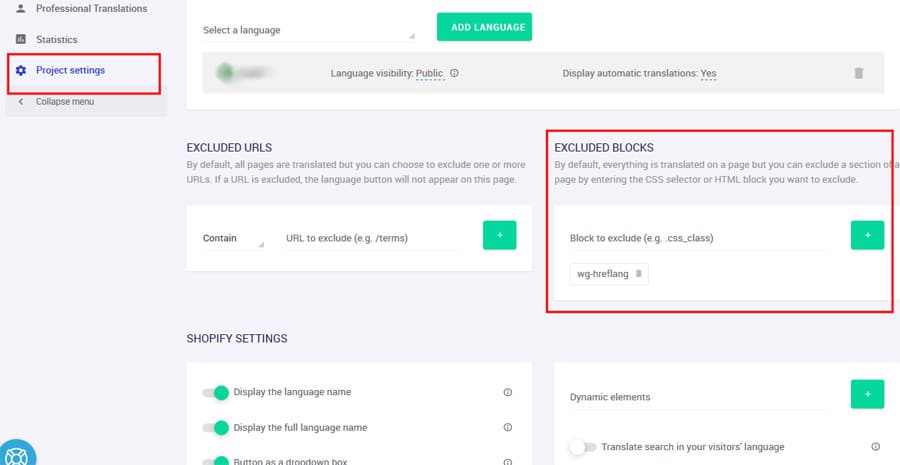
This will make sure your edits are active on all translated versions, which you can verify in Chrome by visiting one of the /a/l/ urls using a Googlebot user agent and checking the HREFLANG tags in the source code.
How to customise LANGSHOP for country specific HREFLANG tags:
(coming soon)
Conclusion & Further Help
There are lots of way to implement HREFLANG tags, but it’s often complicated and hard to get right on each site (particularly with multi-store).
If you would like further help with this, then email me info@matt-jackson.com, or consider my consulting services here.




Hi Matt,
Out of interest, if the content page URLs do not match, will the manual solution work.
e.g. href-lang tags for content on:
http://www.english.co.uk/colour
http://www.usa.com/color
Content would be the same, URLs different – would the hreflang solution work in shopify?
Hi Daniel,
No in this instance it wouldn’t work correctly, as the urls it generated in the tags would be different.
Hello Matt,
Very interesting blog! I would like to know what do you think about My Translate App (by Hextom), because I have many hreflang errors and noone can solve it (neither Shopify)
Thank you
Best Regards
Edith
Hi Marina,
I haven’t used that app before, perhaps you could share your url via email and I’ll take a look: info@matt-jackson.com
Hello Matt Jackson
Semrush found lot of hreflang errors, maybe you know how to fix it? Im using Translation Lab on shopify.
Hi Oleg, send me an email and I’ll have a look: info@matt-jackson.com